一些快速记录的笔记
Git 超大资源仓库拉取超时解决
2026/03/03
团队游戏开发仓库因包含贴图、模型等资源,体积达 14GB+,拉取时持续出现rpc error: DeadlineExceeded、early EOF、unexpected disconnect等超时错误。
前期尝试调整Git本地配置(LFS初始化、延长http超时、调整pack包大小、扩大http.postbuffer等)均无效果,核心原因是服务器端upload-pack进程存在超时阈值,单次拉取全量资源耗时超标导致连接被主动断开。
最终通过分批拉取策略解决,核心脚本(macOS/Linux):
1 | for depth in {100..1000..100}; do |
执行后分批拉取数据,后续无新数据传输,最后执行 git rev-parse --is-shallow-repository 输出 false,确认仓库拉取完整。
修改 VS Code 侧边栏字体
2026/02/10
VS Code 提供的 editor.fontSize 只能修改代码字体信息,但是却不能修改 VS Code 本身的字体,比如:侧边栏,命令面板,设置 UI
这个功能请求在 2015 年就存在了, #519, 在评论区中,找到一条 解决方案
我将文件定义为全局变量,方便之后修改, 仅适用于 MacOS
1 | # https://github.com/microsoft/vscode/issues/519#issuecomment-3691806331 |
在 VSC_WORKBENCH_CSS_FILE 文件底部追加这部分内容即可~
1 | /* https://github.com/microsoft/vscode/issues/519#issuecomment-3691806331 */ |
CSR/SSR/SSG/ISR/DPR/PPR
2025/10/24
- CSR: Client Side Rendering,客户端(通常是浏览器)渲染;
- SSR: Server Side Rendering,服务端渲染;
- SSG: Static Site Generation,静态网站生成;
- ISR:Incremental Site Rendering,增量式的网站渲染;
- DPR:Distributed Persistent Rendering,分布式的持续渲染。
- PPR:Partial Page Rendering,部分页面渲染。
ref: Next.js CSR vs SSR vs SSG vs ISR and now PPR!
MessageChannel vs BroadcastChannel
2025/07/22
| MessageChannel | BroadcastChannel |
|---|---|
| 提供了一个简单的通信机制,允许在同一浏览器上下文中的不同脚本之间进行通信。它创建了一个双向通信通道,可以在两个端点之间发送消息。 | 允许在同一浏览器上下文中的多个脚本之间进行通信。它创建了一个广播通道,任何订阅该通道的脚本都可以接收发送到该通道的消息。 |
SSRF
2025/07/18
SSRF(Server-Side Request Forgery)是一种攻击方式,攻击者可以利用服务器向内部或外部资源发起请求,从而获取敏感信息或执行恶意操作。
RSC use client & use server
2025/06/26
use client将客户端函数导出到服务器。 在底层,后端代码会将它们视为类似/src/frontend.js#LikeButton的引用。它们可以渲染为 JSX 标签,并最终转换为<script>标签use server将服务器函数导出到客户端。 在底层,前端将它们视为通过 HTTP 调用后端的async函数。
ref: What Does “use client” Do? — overreacted
Bash which vs type vs where
2025/01/20
我有一个命令,我想知道它是从哪里来的。我可以使用 which 或 type 命令来查找。
which- 在
$PATH中查找可执行文件。 - 位于
/usr/bin/which。
- 在
type- 确定命令是别名、函数、内置命令、缓存的可执行文件(散列)、
$PATH中的二进制文件等 - shell 内置
- 确定命令是别名、函数、内置命令、缓存的可执行文件(散列)、
where- 与
which类似,但是可以列出所有匹配的命令。 - 不仅适用于 Unix, 也适用于 Windows。
- 与
whence- zsh 内置命令,类似于
type,但输出更简洁。 whence -v等价于type,显示命令的详细类型信息。whence -c等价于which,仅输出路径。
ref:
- zsh 内置命令,类似于
useMemoizedFn vs useEvent vs useLatestFunc ?? vs useEffectEvent
2024/08/02
useMemoizedFn、useEvent、useLatestFunc 和 useEffectEvent,它们都是用来优化函数组件中的性能和行为的工具。
Web Search
2024/07/22
1.在浏览器地址栏输入 ? 可以快速搜索,输入 ? 后再输入关键词,然后回车,就会跳转到搜索引擎搜索结果页面。[Copilot 自动生成]
如题,如果需要在 web 端实现搜索功能可以:
- FlexSearch 实现全文搜索
- CMD K , https://cmdk.paco.me or https://react-cmdk.com
- 命令行模糊查找 fzf
read more:
- How MDN’s autocomplete search works
- How MDN’s site-search works
- mdn/yari search.tsx
- Nextra FlexSearch
ZWSP
2024/07/13
ZWSP(Zero Width Space) wiki 是一种 Unicode 字符. 可以用来做一些很骚的操作,它通常很难被察觉到。
将 \u200b、\u200c、\u200d、\u200e、\u200f、\ufeff 进行一个排列组合,来达很多有趣的效果。
排列组合代码
1 | import 'lodash.permutations'; |
- 为 git commit 做一个幽灵提交,利用它来重新触发 GitHub Actions,也可以蛊惑同事。就像这样
- Zero Width Space on SYMBL (◕‿◕)
- codepoint U+200B ZERO WIDTH SPACE in Unicode
Library 实践
2024/06/24
- 使用 debug 库,可以在开发环境中输出调试信息,生产环境中不输出。
- 或者参考 backup-cli#da278e8 使用
console.log输出调试信息。 - TBD: 有想到再补充。
优化 React 重新渲染技巧
2024/02/29
- 将昂贵的组件 “提升” 到父级,在父级中渲染频率较低。
- 然后将昂贵的组件作为 props 传递下来。
- useMemoizedFn vs useEvent vs useLatestFunc ?? vs useEffectEvent
ref:
Symbolic link
2024/02/08
包含有一条以绝对路径或者相对路径的形式指向其它文件或者目录的引用 ls -s 实际目标 链接名称
examples:
ln -s $TMPDIR $ICLOUD/Temporary
1 | ~ via ⬢ v18.19.0 |
LGTM
2023/11/30
looks good to me
TL;DR
2023/10/27
经常在一些文章中看到 TL;DR,一开始以为是某个技术的缩写,后来才知道是 Too long; didn’t read 的缩写,意思是太长不看。
ref:
pull_request vs pull_request_target
2023/10/16
在给 antd 修改 GitHub Actions 时,发现 preview.yml 有三个文件,于是乎提交了一个 PR#45276 合并,结果导致后续一系列错误。
pull_request 在 PR 创建的时候拉取源分支代码。但是不具备写操作(可以理解为,PR 作者是一个攻击者,他可以更改源代码修改脚本,以至于破坏仓库。
pull_request_target 在 PR 创建的时候拉取目标分支代码。具备读写操作。
ref:
- Github Actions and the threat of malicious pull requests
- Keeping your GitHub Actions and workflows secure Part 1: Preventing pwn requests
tsconfig.json moduleResolution
2023/6/20
起初上游包导致 antd CI 挂了,#41715。 发现上游将包改成了 Pure ESM,但是引用的 js 还是 mjs。
最新的 typescript v5.1, moduleResolution 选项支持 5 个值:classic、node、node16、nodenext、bundler。
其中 nodenext 表示最新的 node 版本,也就是说它兼容 node16。
ref:
认识 Unified 和 Remark
2023/04/17
参与了一段时间的 dumi 开发,认识了 Unified 和 Remark。Unified 是一个用于构建插件化的工具链的框架,而 Remark 是 Unified 的一个插件,用于将 markdown 转换成 AST(抽象语法树),然后对 AST 进行操作。
Node ESM
2023/03/24
最近建了一个 快速开始 Cli 的脚手架, 记一笔 node 的操作
- 获取整个屏幕大小, 可以使用
process.stdout?.columns或 term-size - npm。 - 同构
__dirname可以参考 stack overflow
__filename & __dirname
1 | import { dirname } from 'path' |
require & require.resolve
1 | import { createRequire } from 'module' |
- 清空终端输出
process.stdout.write('\x1B[2J\x1B[3J\x1B[H\x1Bc')或 console-clear - npm;
Github 合作者
2023/03/10

如上图,除非他们对你的 PR 进行 review 的时候提出了建议,并且在 GitHub 点击采纳,否则不会出现合作者标识。另外一种方式是,手动添加合作者。给予我帮助的人都应该出现在合作者一栏中。最简单方法就是在 git commit 的 message body 中加入如下注释:
1 | Co-authored-by: wxh16144 <wxh16144@users.noreply.github.com> |
注意将 ID 替换为合作者的 GitHub ID。
GitHub Merge 三种方式速记
2023/02/27
Merge: (创建 m 个提交节点引用 a、b、c,m 在父节点中有 Init、c)
Squash and merge(合并 a、b、c 以创建一个新的提交并将其添加到目标分支。’a、b、c’ 提交只有父 Init)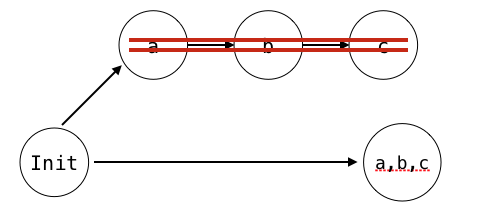
Rebase and merge(将 a、b、c 无缝添加到合并分支,每个提交都有一个父级)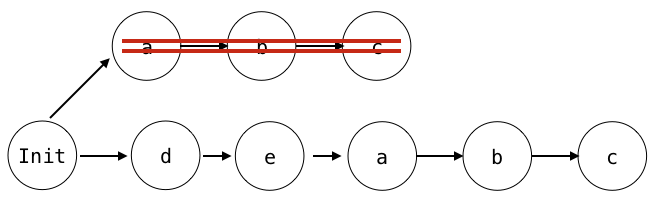
GitHubのMerge、Squash and Merge、Rebase and Mergeを理解する
remove vs removeChild
2022/11/16
- remove: 把对象从它所属的 DOM 树中删除。
- removeChild: 方法从 DOM 中删除一个子节点。并返回删除的节点
大多数时候使用 remove 就好了
innerText vs textContent vs innerHTML
2022/11/16
1 | <body> |
1 | hello // div.innerText |
结论
- innerText 是浏览器渲染后的可见内容
- textContent 准确的内容和缩进格式内容
- innerHtml 同 <标签> + textContent
append vs appendChild
2022/11/16
都是在 Elenent 最后一个节点之后插入 Node, 推荐使用 append
append: append(param1, param2, /* … ,*/ paramN)
appendChild: appendChild(aChild)
- append 可以追加任何 DOMString 对象, appendChild 只接受 Node 对象;
- append 没有返回值,appendChild 返回追加的 Node 对象
- append 支持多个参数,appendChild 只支持一个
Shell 字符串截取
2022/09/02
在使用电脑对某些文件批量重命名,或者批量截取前缀等场景时
${string: start: length}: 从 string 字符串的左边第 start 个字符开始,向右截取 length 个字符。${string: start}: 从 string 字符串的左边第 start 个字符开始截取,直到最后。${string: 0-start :length}: 从 string 字符串的右边第 start 个字符开始,向右截取 length 个字符。${string: 0-start}: 从 string 字符串的右边第 start 个字符开始截取,直到最后。${string#*chars}: 从 string 字符串第一次出现 *chars 的位置开始,截取 *chars 右边的所有字符。${string##*chars}: 从 string 字符串最后一次出现 *chars 的位置开始,截取 *chars 右边的所有字符。${string%*chars}: 从 string 字符串第一次出现 *chars 的位置开始,截取 *chars 左边的所有字符。${string%%*chars}: string 字符串最后一次出现 *chars 的位置开始,截取 *chars 左边的所有字符。
Shell 字符串拼接(连接、合并)
2022/07/07
在写一个 shell 脚本的时候,经常需要对变量字符串进行拼接,记录几种拼接方法;
1 |
|
ref:
/dev/null
2022/05/19
在 Linux 命令中,经常见到 xxx 2>/dev/null, 如为防止 Docker 容器退出使用 tail -f /dev/null。关于这个命令,我的理解是:
0标准输入 stdin,1标准输出 stdout,2错误输出 stderr,>是重定向,/dev/null是个只进不出的地方;如果只关心正常输出,可以在命令后面这样重定向:
commaned 2> /dev/null, 这样一来,我们看到的所有输出,都是命令正常执行的输出,忽略所有错误输出。如果只关心报错内容,可以在命令后面这样重定向
command > /dev/null
ref:
copy & paste
2022/03/19
在 Mac OS 可以使用 pbcopy 和 pbpaste 在命令行中进行复制和粘贴操作:
pbcopy < ~/.ssh/public_key复制 public_key 内容到剪贴板。curl baidu.com | pbcopy复制 baidu.com 站点内容到剪贴板。pbpaste > baidu.html粘贴剪贴板内容到 baidu.html 文件中。
Jest unit testing
2022/03/18
在阅读 AntD 测试用例时,需要单独运行某个组件 case,或者某个组件的一条 case.
- 仅运行 components/button 目录下测试用例:
npm run test -- components/button - 仅运行 button 用例名称为 ‘mount correctly’ 的 case :
npm run test -- components/button -t "mount correctly" - 接上条, 使用 Jest api (test.only、test.skip) 暂时运行/跳过某些 case:
1 | - it('renders correctly', () => { |
其中 npm run test –, -- 是指将后面的参数传递给 script; Passing args into run-scripts.
Snapshot Testing
2022/03/09
antfu 开源的 unconfig Repo 其作用是加载通用配置文件。在仓库的单元测试中发现了快照测试。比如:
Jest snapshot testing, 使用 jest --updateSnapshot 或 jest -u 来更新所有快照。
vitest snapshot testing, 使用 vitest --update 或 vitest -u 来更新所有快照。
ava snapshot testing, 使用 ava --update-snapshots 或 ava -u 来更新所有快照。
顺便补充一个 ava + puppeteer.test 测试示列。
import-maps
2022/02/24
在阅读 New React Docs 时发现文中有交互式调试功能。点击 Download 按钮还可以下载 sandbox.html 文件。直接在浏览器中运行示例代码。
阅读了 reactjs.org repo 后发现是 html 模版中使用了 @babel/standalone 和 <script type="importmap">。
1 | <script type="importmap"> |
markdown-it 和 feed
2022/02/24
笔记这栏是参考 antfu.me/notes 而写的。看到有 rss 订阅,想着自己的笔记也实现一下。使用 hexo 的自动生成 rss 插件无法生成自己想要的。
阅读 antfu.me repo 后才发现,作者是使用 markdown-it 和 feed 自己写脚本实现的。scripts/rss.ts
Vite 插件 unplugin-auto-import
2022/02/16
写 TypeScript 时,使用 unplugin-auto-import 实现按需自动导入 API。
插件 vite-auto-import-resolvers 使用了 unplugin-auto-import 的自定义 resolvers, see github 实现。
位运算符速记
2022/02/09
x ** y=>Math.pow(x, y)x << y=>x * 2 ** yx >> 1=>x >>> 1=>Math.floor(x / 2)~x=>-(x + 1)
git submodule
2022/02/09
- 项目中添加子仓库
git submodule add -b 分支 地址 目录 - 克隆带子模块仓库
git clone --recursive -j8 地址 - 更新已克隆仓库的子仓库
git submodule update --init --recursive - 更新子仓库
git submodule update --remote - 推送所有子仓库而不 push 主仓库
git push --recurse-submodules=only
git
2022/02/09
- 使用
git -C来指定工作目录, e.g.-c $PWD指当前目录 git commit --amend --no-edit --no-verify- –amend 创建一个新的提交来替换当前分支的顶端
- –no-edit 不调用编辑器,使用当前分支顶端提交信息
- –no-verify 绕过 githooks 缩写
-n